Flashback Express 7
User Manual
Downloading and Installing
Recording a Video
Recorder Window
Recorder Settings
Recording the Mouse Cursor
Starting and Stopping Recording
Recorder Control Bar
Advanced Recording Options
Annotating While Recording
Selecting What To Record
Recording on a computer with dual GPUs
Previewing a Recording
Editing a Project
Editing Basics
Navigating the Project Editor
Working with Media
The Timeline
The Video Canvas
Styling Media
Editing Preferences
Exploring Media
Videos
Images
Animations
Shapes
Backgrounds
Text
Titles
Audio
Voiceovers
Subtitles
Blurs
Flashback Pro Movies
Applying Effects
Exporting
Freeze Frame
Licensing Flashback Express 7
Free vs Licensed Use
Purchasing a Flashback Express 7 License
Registering a Flashback Express 7 license
Upgrading From Pro 5 or Express 6
Managing Your Subscriptions
Feature Credits
Registering on an offline PC
Deploying a license to multiple PCs
License Troubleshooting
Misc.
How To Guides
Make a clip from a recording
Replace a voiceover
Record a facecam video
Schedule a recording session
Highlight the mouse cursor
Edit audio for an imported video
How To Move a Project to a New Computer
Record a clear voiceover
Flashback Express 7 Quick Start Guide
Flashback Express 7 FAQs
Flashback Express 6
User Manual
Downloading and Installing
Getting Setup to Record
The Recorder Window
Recording the Screen
Recording Windows and Regions
Recording Sound
Recording a Webcam
Recording the mouse cursor
Recording Settings
Recording
The Recorder Control Bar
Starting, Pausing and Stopping a Recording
Discarding or Restarting a Recording
Saving your recording
Scheduling a recording
Auto-trimming
Editing and Uploading
The Video Window
The Edit & Upload Window
Making a Clip
Uploading a Video
Exporting to other formats
Exporting Audio
Adding Subtitles
Licensing
Flashback Express Free vs Licenced
Purchasing a Flashback Express 6 license
Registering a Flashback Express 6 license
Registering Flashback Express 6 on an offline PC
Deploying a Flashback Express 6 license to multiple PCs
Flashback Express License 6 Troubleshooting
Feature Credits for Transcrptions
Misc.
How To Guides
How to record a facecam video
How to make a clip
How to schedule a recording session
How to capture the mouse cursor
Flashback Express 6 Quick Start Guide
Flashback Express 6 FAQs
Camigo
User Manual
Getting Started
Camigo System Requirements
Downloading and installing
Setting up Camigo
Checking for Updates
Camigo Settings
Using Camigo
Customizing your video
Licensing
Support
Camigo Quick Start Guide
Camigo FAQs
Video Converter
User Manual
Getting Setup
Video Converter System Requirements
Downloading and installing Video Converter
Preferences
Free Trial
Using Video Converter
Converting Format
Format settings
Turbo Conversion
Creating Clips
Cropping a video
Applying Effects
Adding Watermarks
Changing Speed
Inserting Subtitles
Licensing Video Converter
Video Converter Quick Start Guide
Video Converter FAQs
Table of Contents
- All Categories
- Flashback Express 7
- User Manual
- Editing a Project
- Exporting
- Exporting Your Video
Exporting Your Video

When you have finished editing your project, you will need to export it to create a new video file. Flashback Express 7 can export your project to either a MP4, MKV, Webm or GIF file.
Exporting To Video
To export a project to a video file, click the Export button at the top of the Project Editor.
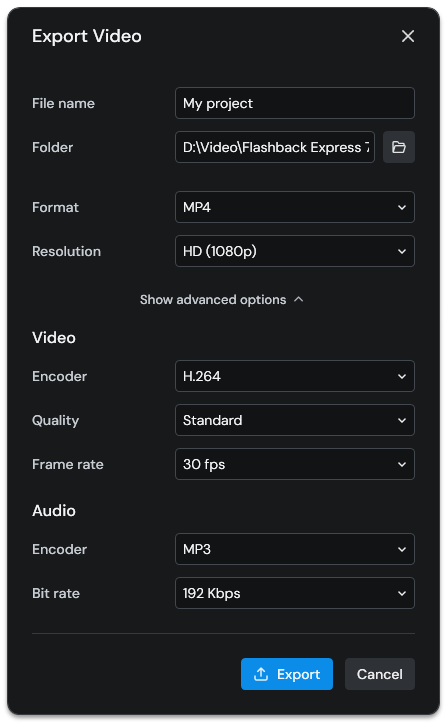
You will then be able to set the following options that will be used for the video file that is created:
Filename - The name of the exported video file. By default, it will be set to the name of the project but you can change it to anything.
Folder - Choose the folder where the exported video file will be saved to. By default, it will be saved to Flashback Express 7's Export folder (\Video\Flashback Express 7\Exports\)
Format - The video format that will be used for the exported video file. By default, MP4 will be selected but MKV can be selected as an alternative.
Resolution - Choose the resolution of the exported video file that is created. By default. HD (1080p) will be seelcted but you can pick from a selection of other popular video resolutions or select Custom to specifiy your own resolution.
Advanced Export Options
If you want greater control over the properties of your exported video file, click Show Advanced Options to make the advanced options appear. You can use the advanced options to customize both the video and audio in the exported video file
Video
Encoder - By default, the popular H.264 encoder will be used. However, if your computer hasa GPU that supports hardware encoding, the H.265 encoder will be available as an alternative.
Quality - Set how much compression is applied to the video file. A higher setting means a better image quality but also a larger file size. A lower setting will produce a worse image but also a smaller file size. By default, Standard quality will be used to give a good compromise between quality and file size.
Frame Rate - Set the frame rate of the video file. A higher frame rate will look smoother but produce a larger file size. A slower frame rate will not look as smooth but will be small in size. By default, the frame rate will be 30 fps but a maximum of 60 fps can be selected.
Audio
Encoder - By default, the audio will be encoded using an MP3 encoder but AAC can also be selected as an alternative encoding format.
Bitrate - Set the bitrate of the audio. By default, 192 kbps will be used.