Flashback Express 7
User Manual
Downloading and Installing
Recording a Video
Recorder Window
Recorder Settings
Recording the Mouse Cursor
Starting and Stopping Recording
Recorder Control Bar
Advanced Recording Options
Annotating While Recording
Selecting What To Record
Recording on a computer with dual GPUs
Previewing a Recording
Editing a Project
Editing Basics
Navigating the Project Editor
Working with Media
The Timeline
The Video Canvas
Styling Media
Editing Preferences
Exploring Media
Videos
Images
Animations
Shapes
Backgrounds
Text
Titles
Audio
Voiceovers
Subtitles
Blurs
Flashback Pro Movies
Applying Effects
Exporting
Freeze Frame
Licensing Flashback Express 7
Free vs Licensed Use
Purchasing a Flashback Express 7 License
Registering a Flashback Express 7 license
Upgrading From Pro 5 or Express 6
Managing Your Subscriptions
Feature Credits
Registering on an offline PC
Deploying a license to multiple PCs
License Troubleshooting
Misc.
How To Guides
Make a clip from a recording
Replace a voiceover
Record a facecam video
Schedule a recording session
Highlight the mouse cursor
Edit audio for an imported video
How To Move a Project to a New Computer
Record a clear voiceover
Flashback Express 7 Quick Start Guide
Flashback Express 7 FAQs
Flashback Express 6
User Manual
Downloading and Installing
Getting Setup to Record
The Recorder Window
Recording the Screen
Recording Windows and Regions
Recording Sound
Recording a Webcam
Recording the mouse cursor
Recording Settings
Recording
The Recorder Control Bar
Starting, Pausing and Stopping a Recording
Discarding or Restarting a Recording
Saving your recording
Scheduling a recording
Auto-trimming
Editing and Uploading
The Video Window
The Edit & Upload Window
Making a Clip
Uploading a Video
Exporting to other formats
Exporting Audio
Adding Subtitles
Licensing
Flashback Express Free vs Licenced
Purchasing a Flashback Express 6 license
Registering a Flashback Express 6 license
Registering Flashback Express 6 on an offline PC
Deploying a Flashback Express 6 license to multiple PCs
Flashback Express License 6 Troubleshooting
Feature Credits for Transcrptions
Misc.
How To Guides
How to record a facecam video
How to make a clip
How to schedule a recording session
How to capture the mouse cursor
Flashback Express 6 Quick Start Guide
Flashback Express 6 FAQs
Camigo
User Manual
Getting Started
Camigo System Requirements
Downloading and installing
Setting up Camigo
Checking for Updates
Camigo Settings
Using Camigo
Customizing your video
Licensing
Support
Camigo Quick Start Guide
Camigo FAQs
Video Converter
User Manual
Getting Setup
Video Converter System Requirements
Downloading and installing Video Converter
Preferences
Free Trial
Using Video Converter
Converting Format
Format settings
Turbo Conversion
Creating Clips
Cropping a video
Applying Effects
Adding Watermarks
Changing Speed
Inserting Subtitles
Licensing Video Converter
Video Converter Quick Start Guide
Video Converter FAQs
Table of Contents
- All Categories
- Camigo
- User Manual
- Using Camigo
- Camigo Window
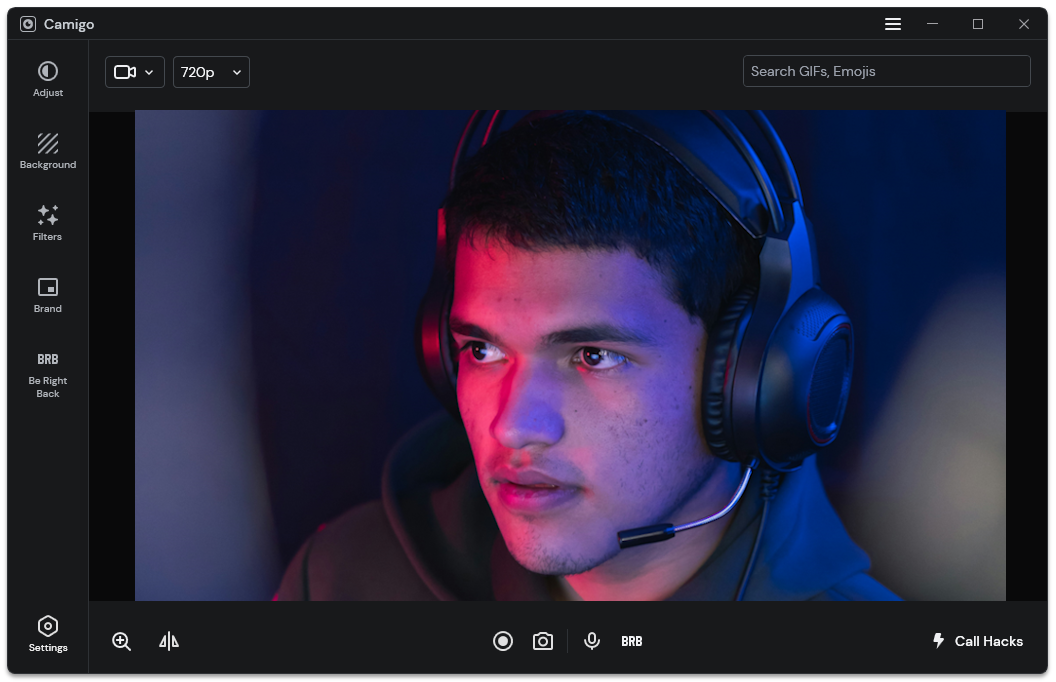
Camigo Window

When Camigo runs, you'll see the Camigo window
The Camigo window shows a preview of your video as others will see it and lets you configure your webcam. If you have any call hacks activate or have applied any customisation to your webcam video, the preview video lets you see exactly how the video will appear to others.
Options Menu
In the top right corner of the window, the  button can be clicked to open Camigo's Options menu, from where you can enter a license key, open your recordings and snapshot folders, get help and close the app.
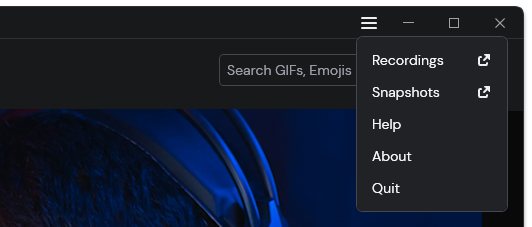
Enter License Key - Only displayed when using the free version of Camigo. If you have purchased a license, click to enter your license key. See Licensing Camigo for more information.
Recordings - Click to open your Recordings folder, which is where your screen recording will be saved to.
Snapshots - Click to open your Snapshots folder, which is where your screenshots will be saved to.
Help - Click to open the Help tab of the Settings, where you can access help resources and get help.
About - Click to check which version of Camigo you have installed and to check for new updates.
Quit - When you close the Camigo window, the app will be minimised to the System Tray, where it will continue running in the background. Click the Quit option to completely close the Camigo app.
Webcam Controls
Above the webcam preview, the  button let's you update which webcam you are using. The drop down menu will contain all webcams that are currently available to you.
Next to the webcam selection button, you to select the resolution of the webcam video. Depending on what the selected webcam is capable of, you can select from 4K, HD, 720p, 480p and 360p. (4K and HD are only available when Camigo has been upgraded)
GIF and Emoji Search
Also above the preview video, the Search GIFs & emojis searchbar in the top right corner allows you to search through a library of emojis and GIFs that you can add on top of your webcam video. Simply enter search words to look for something suitable to add to your video and then click on your choosen GIF or emoji to make it appear on your video.
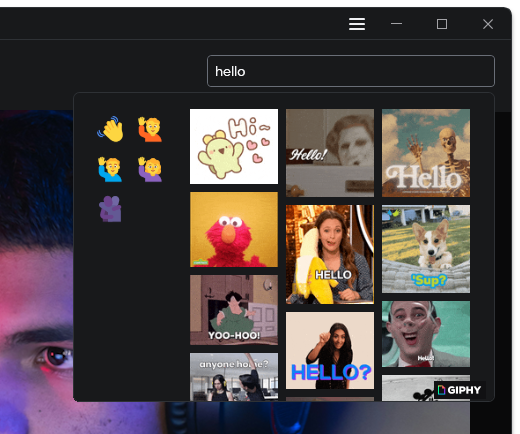
See GIFs and emojis for more information
Control bar
The control bar is found below the video preview.

 button to open the Zoom menu. Selecting Manual Zoom will allow you to zoom towards the center of the video image using the zoom slider. Selecting Auto face detection will apply a predefined zoom which will follow your face when you move to always keep you in the middle. See Zooming for more information.
Mirror - Click the
 button to horizontally flip the video image to make it appear mirrored. Click again to revert to being unflipped.
Record - Start recording your screen by clicking the
 button. Then click the button again to stop recording. See Capture your screen for more information.
Snapshot - Save a screenshot of what is currently shown on the screen by clicking the
 button. See Capture your screen for more information.
Mute - Mute and unmute your microphone by toggling the
 button on and off.
BRB - Toggle the currently selected Be Right Back video on and off by clicking the BRB button. See Be Right Back for more information.
Call Hacks Menu
The Webcam Loop and Fake Buffering hacks can be accessed by clicking the Call Hacks button in the bottom right corner of the Camigo window.
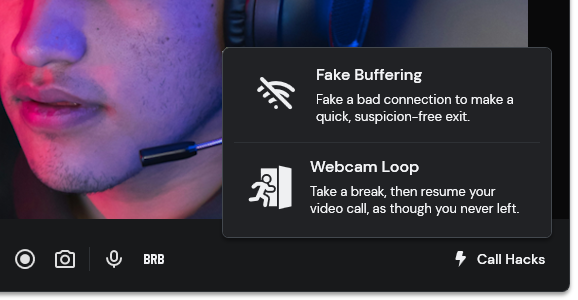
Click on either the Webcam Loop or Fake Buffering button in the Call Hacks menu to activate that hack. Clicking the same button again will deactivate that hack.
See Webcam Loop and Fake Buffering for more details
Customization Panel
When you ciick on the Adjust, Background, Filters, Brand or Be Right Back buttons, the Customization Panel will extend across from the left side of the Camigo window to display the relevant options for whichever type of customization you have selected.
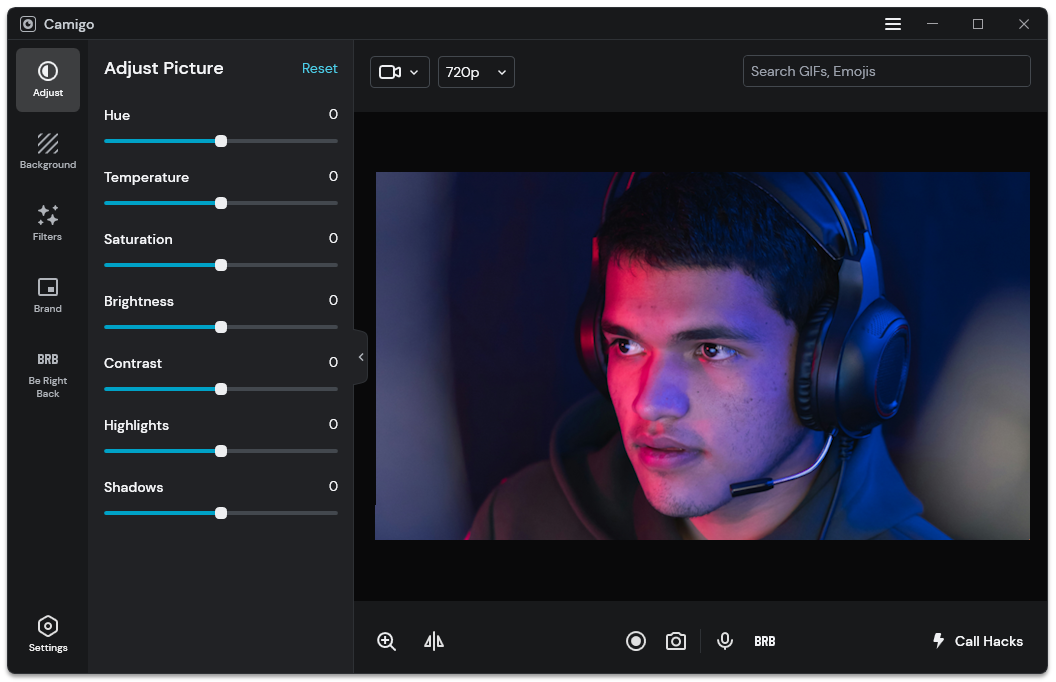
The Customization Panel can be hidden at any time by clicking the < button on its right edge.
Settings
Click the Settings button at the bottom of the side panel to open Camigo's settings.
See Camigo Settings for more information