Flashback Express 7
User Manual
Downloading and Installing
Recording a Video
Recorder Window
Recorder Settings
Recording the Mouse Cursor
Starting and Stopping Recording
Recorder Control Bar
Advanced Recording Options
Annotating While Recording
Selecting What To Record
Recording on a computer with dual GPUs
Previewing a Recording
Editing a Project
Editing Basics
Navigating the Project Editor
Working with Media
The Timeline
The Video Canvas
Styling Media
Editing Preferences
Exploring Media
Videos
Images
Animations
Shapes
Backgrounds
Text
Titles
Audio
Voiceovers
Subtitles
Blurs
Flashback Pro Movies
Applying Effects
Exporting
Freeze Frame
Licensing Flashback Express 7
Free vs Licensed Use
Purchasing a Flashback Express 7 License
Registering a Flashback Express 7 license
Upgrading From Pro 5 or Express 6
Managing Your Subscriptions
Feature Credits
Registering on an offline PC
Deploying a license to multiple PCs
License Troubleshooting
Misc.
How To Guides
Make a clip from a recording
Replace a voiceover
Record a facecam video
Schedule a recording session
Highlight the mouse cursor
Edit audio for an imported video
How To Move a Project to a New Computer
Record a clear voiceover
Flashback Express 7 Quick Start Guide
Flashback Express 7 FAQs
Flashback Express 6
User Manual
Downloading and Installing
Getting Setup to Record
The Recorder Window
Recording the Screen
Recording Windows and Regions
Recording Sound
Recording a Webcam
Recording the mouse cursor
Recording Settings
Recording
The Recorder Control Bar
Starting, Pausing and Stopping a Recording
Discarding or Restarting a Recording
Saving your recording
Scheduling a recording
Auto-trimming
Editing and Uploading
The Video Window
The Edit & Upload Window
Making a Clip
Uploading a Video
Exporting to other formats
Exporting Audio
Adding Subtitles
Licensing
Flashback Express Free vs Licenced
Purchasing a Flashback Express 6 license
Registering a Flashback Express 6 license
Registering Flashback Express 6 on an offline PC
Deploying a Flashback Express 6 license to multiple PCs
Flashback Express License 6 Troubleshooting
Feature Credits for Transcrptions
Misc.
How To Guides
How to record a facecam video
How to make a clip
How to schedule a recording session
How to capture the mouse cursor
Flashback Express 6 Quick Start Guide
Flashback Express 6 FAQs
Camigo
User Manual
Getting Started
Camigo System Requirements
Downloading and installing
Setting up Camigo
Checking for Updates
Camigo Settings
Using Camigo
Customizing your video
Licensing
Support
Camigo Quick Start Guide
Camigo FAQs
Video Converter
User Manual
Getting Setup
Video Converter System Requirements
Downloading and installing Video Converter
Preferences
Free Trial
Using Video Converter
Converting Format
Format settings
Turbo Conversion
Creating Clips
Cropping a video
Applying Effects
Adding Watermarks
Changing Speed
Inserting Subtitles
Licensing Video Converter
Video Converter Quick Start Guide
Video Converter FAQs
Table of Contents
- All Categories
- Flashback Express 7
- User Manual
- Recording a Video
- Advanced Recording Options
Advanced Recording Options

Auto-trimming
There may be times when you want to leave Flashback Express 7 running continuously but only keep the last few minutes of recording. You can do this by enabling Auto-trimming mode on the Recorder tab of the Settings Window.
When trimming mode is enabled, the last few minutes will be kept and anything older than that will be discarded. This is useful if you are waiting for an short event to happen but don't want to create a long video while you wait.
The length of time that is kept can be set by selecting the relevant number of minutes using the Save the last option. A mininium of 1 min and a maximum of 25 minutes can be saved after auto-trimming.
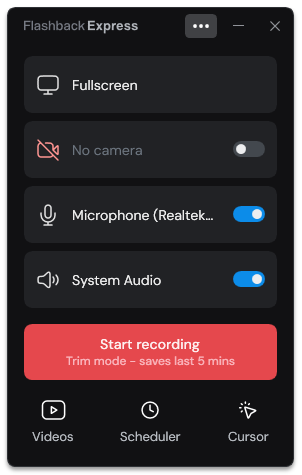
If trimming mode has been enabled, a reminder is displayed in the Start recording button which indicates how much of the recording session will be kept.
Scheduling Recordings
If you are not going to be at your PC when you want to record something, you can create a scheduled recording and Flashback Express 7 will automatically start recording at the specified time.
When the start time for an active schedule is reached, Flashback Express 7 will automatically start recording the selected area and then automatically stop at either the specified stop time or after the specified duration has elapsed.
Multiple scheduled recordings can be setup and each one can either run once or be repeated.
Viewing schedules
If there are any active schedules that are upcoming, a red number will appear over the  button to indicate how many active schedules there are and a message will appear below the Start recording button to indicate when the next scheduled recording will begin.

Click the button to open the Scheduler window and view a list of upcoming and completed schedules.
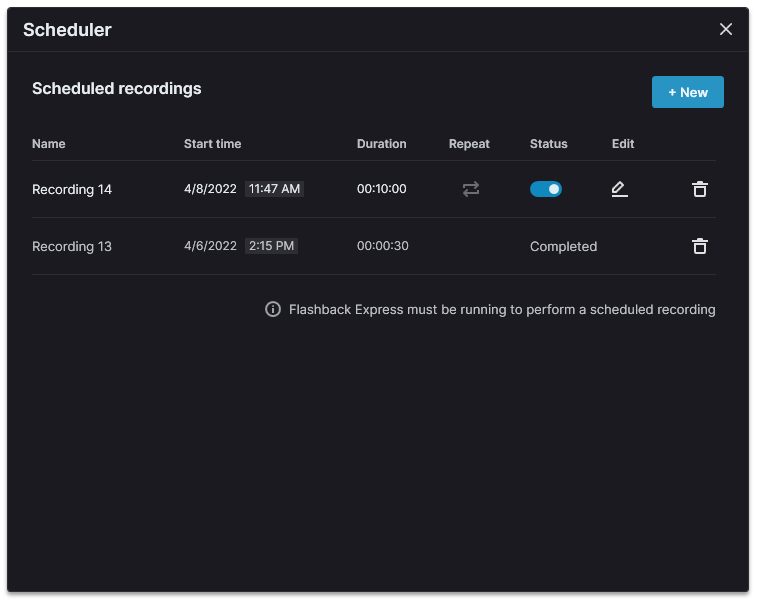
Delete upcoming or completed schedules by clicking the  button next to that schedule.
Or an upcoming schedule can be deactivated without deleting it by toggling the Status setting.
Adding and editing schedules
Click the  button on the Scheduler window to open the Schedule new recording window to add a new schedule or click the
  button next to an existing schedule to edit it.
Scheduling
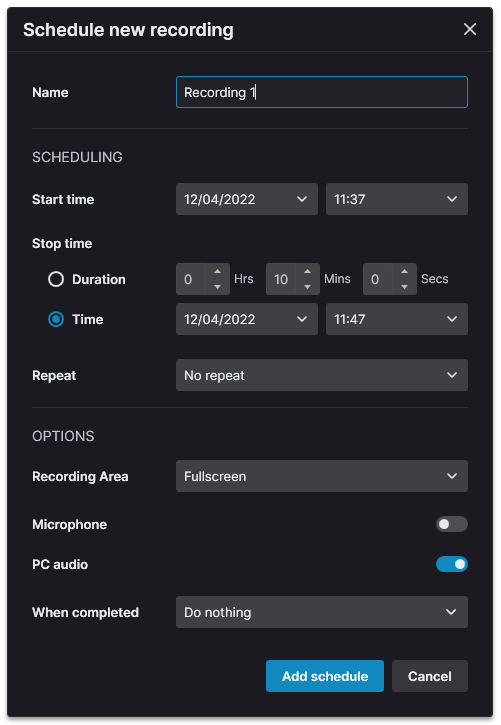
For each scheduled recording, you will need to set the start time and date and then set a stop time. The stop time can be set either by entering the duration to record for or the time and date when recording should stop. Click on each time and date to open the clock and calendar to choose the times and dates.
There is a 24 hour limit for each schedule and it is not possible to have overlapping schedules that would occur at the same time.
If the scheduled recording should repeat, click on No Repeat and select the days on which you want the scheduled recording to automatically record.
Options
The Recording Area of the scheduled recording can be set to Fullscreen, Region or Window. If region is used, the selected region will be remembered so changes to the region via the Recorder window will not affect the scheduled recording. If the window option is used but the target window is moved before the schedule starts, the selected region will not follow the window so the will need to be reselected on the Schedule Recording window before the scheduled start time.
In addition to recording the screen, audio can be recorded as well be enabling the PC audio and Microphone options.
By default, at the end of the schedule, the video will be saved and nothing else will happen. However, the When completed option lets you Quit Flashback, Sleep PC or Shutdown PC if you don't want to leave Flashback or your PC running when not in-use.